Pre-deployment Steps
This section outlines the steps to take before the installation meeting or the InGenius deployment.
Kick-Off Meeting
Prior to the installation meeting, an InGenius deployment specialist will give you an opportunity to schedule a brief kick-off meeting.
The kick-off meeting is a chance to gather everyone involved with the deployment and discuss the process. The installation will be conducted over a screen share.
The license key and software download link is provided during the installation. The license key is not required to complete the Pre-deployment checklist or steps.
Pre-configuration
Depending on the telephony or CRM system you are using, additional configuration steps may be necessary. Follow the pre-deployment instructions below:
Asterisk Pre-Deployment
InGenius supports Asterisk server versions integrated with any SIP phones. InGenius uses the AMI protocol to connect to an Asterisk server and issue telephony commands to control a user’s phone. In order for an Asterisk switch to support InGenius Asterisk Server Connections, the Asterisk switch must meet these requirements:
- Asterisk Manager Interface (AMI) must be enabled.
- Asterisk Manager Interface (AMI) port must be verified.
- The InGenius Server application must be granted access to AMI.
Enable the Asterisk Manager Interface (AMI)
Locate the manager.conf and open the file for editing. To enable AMI support in the Asterisk switch, set enabled = yes. Reload the Asterisk configuration after the AMI connections are enabled.
Example:
enabled = yes
Set the Asterisk Manager Interface Port
The port specified in the[general] section of the manager.conf file is the port used for the Server port when a Asterisk Server Connection profile is created. If the port number is changed, reload the Asterisk configuration. By default the telephony protocol AMI listens on TCP port 5038.
Example:
[general]
enabled = yes
port = 5038
bindaddr = 0.0.0.0
The bindaddr controls which IP address the server accepts AMI connections on. It is recommended to set the bindaddr to an internal IP address to prevent authorized access. If a publicly available connection is used for the AMI connection, ensure security is configured on that port to prevent unauthorized access.
Enable Manager Access over AMI
When connecting to the Asterisk switch using AMI, InGenius uses a management account and password to authenticate the user. An AMI management account with sufficient permissions needs to be configured on the Asterisk server. The management account requires the call read permission, and call and originate write permissions. To configure the account, open the manager.conf file for editing. Add the AMI management account information to the end of the file.
Example:
[username]
secret = password
read = call,system
write = call,system,originate
The entry creates a management account to use when creating an Asterisk Server Connection profile. The username and password are defined by the administrator in this file.
Auto Answer
Configure Auto Originate on the Asterisk switch to enable the answer button within InGenius. Open the extension.conf file for editing within the Asterisk configuration. Append the file with the following information:
Settings for SIP Channel Provider:
[macro-ice-clear-auto-answer]
exten => s,1,SIPRemoveHeader(${ICE-AUTO-ANSWER-HEADER})
[ice-originate-auto-answer]
exten => _autoX.,1,ExecIf($["${ICE-AUTO-ANSWER-HEADER}" != ""]?SIPAddHeader(${ICE-AUTO-ANSWER-HEADER}))
same => n,Dial(SIP/${EXTEN:4},,M(ice-clear-auto-answer))
[ice-clear-auto-answer-and-dial]
exten => _.,1,Macro(ice-clear-auto-answer)
same => n,ExecIf($["${ICE-CONTEXT}" != ""]?Goto(${ICE-CONTEXT},${EXTEN},1))
Settings for PJSIP Channel Provider (Asterisk version 13 or greater):
[ice-originate-auto-answer]
exten => autoX.,1,Dial(PJSIP/${EXTEN:4},,b(set-auto-answer-headers^sub^1))
[set-auto-answer-headers]
exten => sub,1,Set(PJSIP_HEADER(add,Call-Info)=answer-after=0)
exten= > sub,2,Set(PJSIP_HEADER(add,Alert-Info)=<http://127.0.0.1>\;info=alert-autoanswer\;delay=0)
Settings for SIP Channel Provider (Asterisk version 16):
[ice-clear-auto-answer]
exten => s,1,NoOp("Clear auto answer macro")
same => n,ExecIf($["${ICE-AUTO-ANSWER-HEADER}" != ""]?SIPRemoveHeader(${ICE-AUTO-ANSWER-HEADER}))
same => n,Return()
[ice-originate-auto-answer]
exten => _autoX.,1,ExecIf($["${ICE-AUTO-ANSWER-HEADER}" != ""]?SIPAddHeader(${ICE-AUTO-ANSWER-HEADER}))
same => n,Dial(SIP/${EXTEN:4},,U(ice-clear-auto-answer))
[ice-clear-auto-answer-and-dial]
exten => _.,1,NoOp("Clear auto answer")
same => n,Gosub(ice-clear-auto-answer,s,1)
same => n,ExecIf($["${ICE-CONTEXT}" != ""]?Dial(Local/${EXTEN}@${ICE-CONTEXT}))
Settings for PJSIP Channel Provider (Asterisk version 16):
[PJSIP-ice-originate-auto-answer]
exten => _autoX.,1,Dial(PJSIP/${EXTEN:4},,b(PJSIP-set-auto-answer-headers^sub^1))
[PJSIP-set-auto-answer-headers]
exten => sub,1,Set(PJSIP_HEADER(add,Call-Info)=answer-after=0)
exten => sub,2,Set(PJSIP_HEADER(add,Alert-Info)=<http://127.0.0.1>\;info=alert-autoanswer\;delay=0)
same => n,Return()
[PJSIP-ice-clear-auto-answer]
exten => s,1,Set(PJSIP_HEADER(remove,Alert-Info)=)
same => n,Return()
[PJSIP-clear-auto-answer-and-dial]
exten => _X.,1,Gosub(PJSIP-ice-clear-auto-answer,s,1)
same => n,Goto(default,${EXTEN},1)
Avaya Pre-Deployment
InGenius uses the Avaya Aura Communications Manager TSAPI interface to connect to users’ Avaya phones. This connection will go through a single InGenius profile that will need to be set up on your Avaya switch. The following outlines how to create the InGenius User.
Note: Make sure to include an extension under device information that will be accessible during installation.
- Log onto the Avaya Applications Enablement Services Management Console of your Avaya switch.
- Under User Management select User Admin.
- Click Add User.
- Enter IC_CTI in the User ID, Common Name, and Surname fields type and provide a password.
- Under CT User select YES.
- Scroll to the bottom of the page and click Apply.
- There are two security options to configure the IC_CTI user; unrestricted access which allows the IC_CTI user access to all devices, or assign specific devices to the new user IC_CTI:
- Unrestricted Access
This will give IC_CTI full access to all devices:- Navigate to Security | Security Database | CTI Users | List All Users.
- Select the IC_CTI user that you just created.
- Select Unrestricted Access.
- Click Apply Changes.
- Specific Device Access
This will give IC_CTI access to specific devices only:- Navigate to Security | Security Database | Devices and manually add device(s).
- Click Apply Changes.
- Navigate to Security | Security Database | Device Groups.
- Create the new group IC_GRP and select the devices.
- Click Apply Changes.
- Navigate to Security | Security Database | CTI Users | List All Users;
Select IC_CTI user.
Select IC_GRP from Call and Device Control.
Click Apply Changes.
- Unrestricted Access
Licensing for DMCC and TSAPI Services
InGenius uses the Avaya Aura Communications Manager TSAPI interface to connect to users’ Avaya phones. The telephony gateway uses the Application Enablement Services DMCC service to connect to the DMCC port. Verify the licenses and services are running on the following components:
- Avaya Aura Communication Manager - TSAPI Service.
- Avaya AES - DMCC Service.
Note: Contact your Avaya representative to obtain the required licenses if required.
- Log into the Avaya Applications Enablement Services Management Console of your Avaya switch.
- Click AE Services.
- Verify that DMCC and TSAPI Services are configured with the following options:
Status = ONLINE
State = Running
License Mode = NORMAL MODE
Connection Name
After you have set up your Avaya Communications Manager for InGenius, make a note of the connection name. This will be required later during your installation.
To access this information:
- Log into the Avaya AES Management Console.
- From the menu to the left of your screen, expand Communication Manager Interface.
- Select Switch Connections to view Connection Name information.
- Record this information for further reference.
![]()
Note: This information is case sensitive.
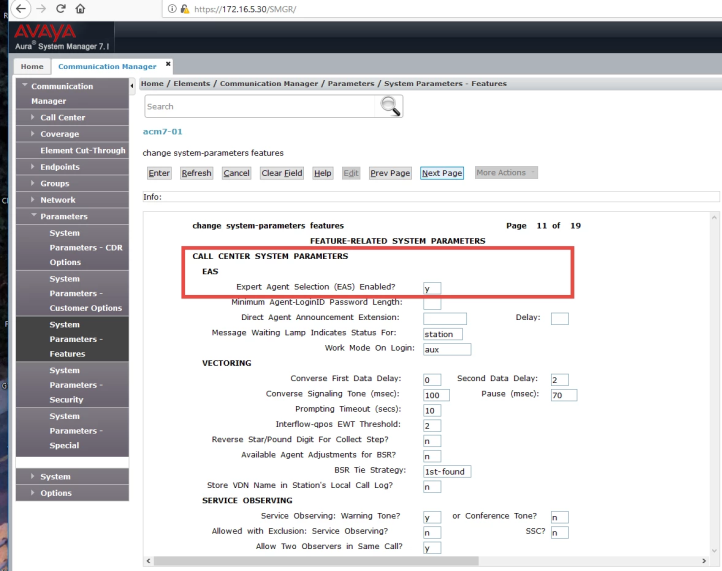
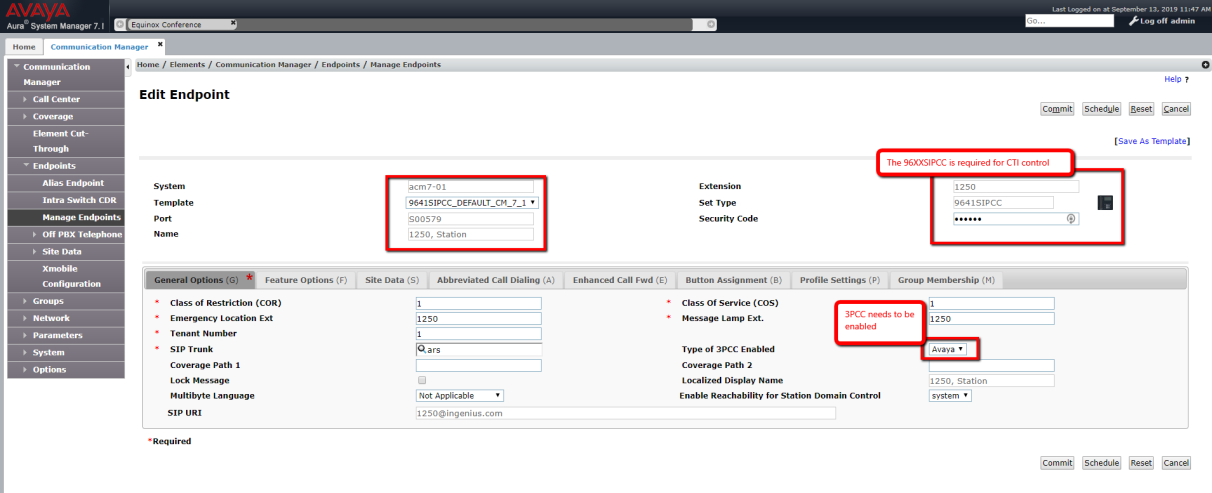
Avaya SIP Configuration
The following settings must be configured in Avaya Communication Manager if using Avaya SIP phones:
- Enable Expert Agent Selection (EAS) as shown in the image below.
- Enable CTI for the SIP endpoint. Use a 96xxSIPCC template and enable the 3PCC, as shown in the image below.
Cisco UCCE Pre-Deployment
Cisco Finesse Server Certificate
In order for InGenius to connect to the Cisco Finesse server properly over SSL:
- You must have a valid certificate on the Cisco Finesse server.
- You must obtain the Cisco Finesse trusted Tomcat certificate and add it to the trusted root authority on the InGenius server.
Cisco Preview Dialer
Preview dialer reserves an agent prior to initiating an outbound call. A popup window displays the options available to the agent. The agent manages the call by choosing one of the options; Skip, Accept or Reject.
To enable Preview Dialer for Cisco, create a campaign on the Cisco Administrative Workstation. Create skill groups to provide preview dialing capabilities for agents depending on their roles. Refer to the Cisco documentation on Outbound Option Campaign for more information.
Cisco Tasks
Ensure CTI is installed on the Cisco switch to enable InGenius to connect to the system. Additional configuration may be required if new users, queues or voicemail drops are added.
Cisco UCCX Pre-Deployment
Cisco Finesse Server Certificate
In order for InGenius to connect to the Cisco Finesse server properly over SSL:
- You must have a valid certificate on the Cisco Finesse server.
- You must obtain the Cisco Finesse trusted Tomcat certificate and add it to the trusted root authority on the InGenius server.
Cisco Tasks
Ensure CTI is installed on the Cisco switch to enable InGenius to connect to the system. Additional configuration may be required if new users, queues or voicemail drops are added.
Cisco UCM Pre-Deployment
Cisco Tasks
Ensure CTI is installed on the Cisco switch to enable InGenius to connect to the system. Additional configuration may be required if new users, queues or voicemail drops are added.
Cisco TAPI Configuration
- Log into the Cisco server.
- Navigate to User Management | Application User |Add New.
- Enter the User ID "IC_TAPI".
- Set a password.
- Select the Available Devices tab and select all phones required to be controlled by InGenius. Drag and drop the objects to the Controlled Devices list.
- Navigate to the Permissions Information|Add to User Group and select the following groups:
- Standard CTI Allow Call Monitoring
- Standard CTI Allow Control of All Devices
- Standard CTI Allow Control of Phone supporting Connected Xfer and conf
- Standard CTI Enabled
- Click Save.
- Navigate to Application | Plugins.
- Download Cisco TAPI Client.
- Run the TAPI client installation on the server.
- Use the IC_TAPI credentials which are case sensitive.
- Use the Cisco server IP for the CTI Manager 1 address (change the address type to IPv4).
- Select Allow Non-Administrative Users to manage their User ID/Password credentials. Keep the default on all the other settings.
- The server requires a reboot after the TAPI client install. If an file lock error occurs during the installation, complete the initial install and the rerun the install process.
Note: Visual Studio C++ Redistribution 2012 is required to run the TAPI Cisco 11 on a Windows 2012 Server.
Genesys Engage Pre-Deployment
InGenius supports a Genesys server working with any SIP phones (Avaya, Genesys, Polycomm) or the Genesys softphones. Refer to Genesys documentation for more information.
InGenius uses the CTI protocol to connect to a Genesys server and issue telephony commands to control a user’s phone. In order for an Genesys switch to support InGeniusGenesys Server Connections, the Genesys switch must meet these requirements:
- Genesys Config server and Tserver must have bidirectional communication.
- The Genesys Config server must have an InGenius application created.
- The InGenius Config server application must be contain connection information such as IP address and port.
Create the InGenius Application
Open the Genesys Config Server tool.
- Add a third party template.
- Enter the template name.
- Add an application using the third party template.
- Enter the application name as InGenius.
- Configure the following fields:
- The Tserver name
- Connection protocol = addp
- Local Timeout = 60
- Remote Timeout = 90
- Trace Mode = trace on both sides
Add the User Account
The InGenius server requires an account to connect to the Genesys system. Add a user account, role and assign the user to a default group. This user account is used to integrate the InGenius server into the Genesys system.
- Open the Genesys Config Tool.
- Select to add a user and enter the username and password.
- Assign a role to the new user account.
- Add the user account to the default group.
Microsoft Dynamics Pre-Deployment
Microsoft Dynamics 365 must first be pre-configured with Azure AD (Azure Active Directory) to integrate properly with InGenius Connect and allow for a secure authentication process for your users.
Create and Setup an Open ID Provider App Registration
An application must first be created in Azure AD that your D365 users will use to send a request to login to InGenius.
Create an Open ID Provider App Registration
To create and configure this application, follow the instructions below:
-
Login to your Microsoft D365 instance.
-
Access the Admin app from the 9 dots on the top-right corner.
-
From Admin, select ... Show All | Admin Centers | Microsoft Entra
-
In the top search bar, search for and select 'App Registrations', and then click + New registration from the top ribbon.
-
Input the following information into the registration window:
-
Name: Enter an appropriate name.
-
Supported account types: Select 'Accounts in any organizational directory (Any Azure AD Directory - Multitenant)'
-
Redirect URI: This URI is required for identity provider registration. If you have been provided with a URI already, paste it here and select Web from the dropdown. Otherwise, paste in: "https://mscrm-ingenius.auth.<Region>.amazoncognito.com/oauth2/idpresponse", making sure to replace <Region> with your deployed InGenius region.
Note: <Region> corresponds to your deployed InGenius region. (i.e ca-central-1, us-west-2, eu-west-1, or ap-southeast-2. Refer to Network Requirements for more information.)
-
-
Click Register
-
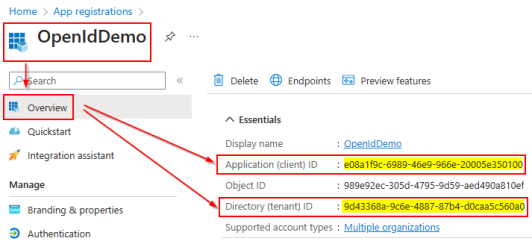
In your newly registered app, under Overview | Essentials, record the following information to be used later during configuration:
-
Application (Client) ID
-
Directory (Tenant) ID
-
Add an Optional Claim for the App Registration Token
To access and use the appropriate log in information for your D365 users, an optional claim must be created and configured for your newly registered app as follows:
-
From the top search bar, search for and select 'App Registrations', and under All applications, search for your newly registered app created in the previous section.
-
Under Manage | Token Configuration, click the '+ Add optional claim' button under Optional claims
-
In the right panel, fill in the information as follows then click Add:
-
Token type: Select 'ID'.
-
Claim: Check the boxes next to 'email', 'family_name', and 'given_name'
-
-
When prompted, click Add, then check the box to 'Turn on the Microsoft Graph email, profile permission' (required for claims to appear in token) and click Add again.
Add API Permissions for your App Registration
To allow InGenius to read user information and authenticate, some API permissions must be granted for your app:
-
From the top search bar, search for and select 'App Registrations' and select your newly registered app.
-
Under Manage | API Permissions, select the 'Microsoft Graph' listing.
-
In the right panel in Request API Permissions | Select Permissions, select the following permissions:
-
Under OpenId permissions, check the boxes for: 'email', 'openid', and 'profile'.
-
Under User, check the box for: 'User.Read'
-
-
Click the Update Permissions button to apply these changes.
-
Under Configured permissions, select the Grant Admin Consent for InGenius button and click Yes when prompted.
Configure Authentication for your App Registration
Your app registration must be configured to request ID tokens from the InGenius authorization endpoint. Follow the instructions below:
-
From the top search bar, search for and select 'App Registrations' and select your newly registered app.
-
Under Manage | Authentication, select the following options under 'Implicit grant and hybrid flows':
-
Check the box for 'ID tokens (used for implicit and hybrid flows)
-
Under Supported account types, select 'Accounts in any organizational directory (Any Azure AD directory - Multitenant)'
-
-
Click the Save button to confirm your selection.
Create Secret for your App Registration
-
From the top search bar, search for and select 'App Registrations' and select your newly registered app.
-
Under Manage | Certificates & secrets, click the '+ New client secret' button below the 'Client secrets' section.
-
From the right panel, fill in the information for the client secret as follows:
-
Description: Enter an appropriate description.
-
Expires: Select the preferred expiry duration for this secret.
Note: It is recommended, out of convenience of not having to recreate the client secret, to select the longest duration '(730 days)'.
-
-
Click Add
-
In the listing for your newly created client secret, record the line under the Value column. This string will be used in the authentication process.
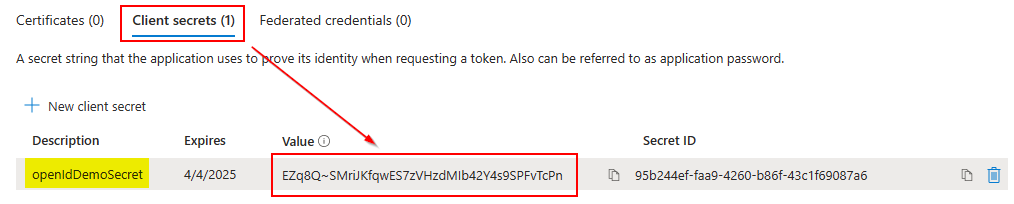
Note: Make sure to record the string under the Value column, and not the Secret ID.

Add Org Related Claims to Registered App
Org related claims must be attached to the authorized token so that they can be processed in the InGenius application.
Add Static Claims to App
-
From the top search bar, search for and select 'Enterprise Applications', then under the Manage section, select All applications and select your newly registered app.
-
In the left hand panel, go to Manage | Single sign-on.
-
Under the 'Attributes & Claims' card, click the Edit button. In the Attributes & Claims page, click '+ Add new claim'.
-
On the Manage claim page, fill in the information as follows:
-
Name: org_id
-
Source: Select 'Attribute'
-
Source attribute: Enter your org id
Caution: The name field must exactly match the above.
Note: Your organization ID can be found from your D365 instance by navigating to your Environments page, under the details section for your environment.
-
-
Click Save.
Update Application Manifest
-
Navigate to App Registrations through the top menu search bar and then select your newly registered app.
-
Under the Manage section, select Manifest.
-
In the XML text editor, update the app manifest to accept mapped claims as follows:
-
Set the value of 'acceptMappedClaims' to be true by changing the line to "acceptMappedClaims": true
Copy"acceptMappedClaims": true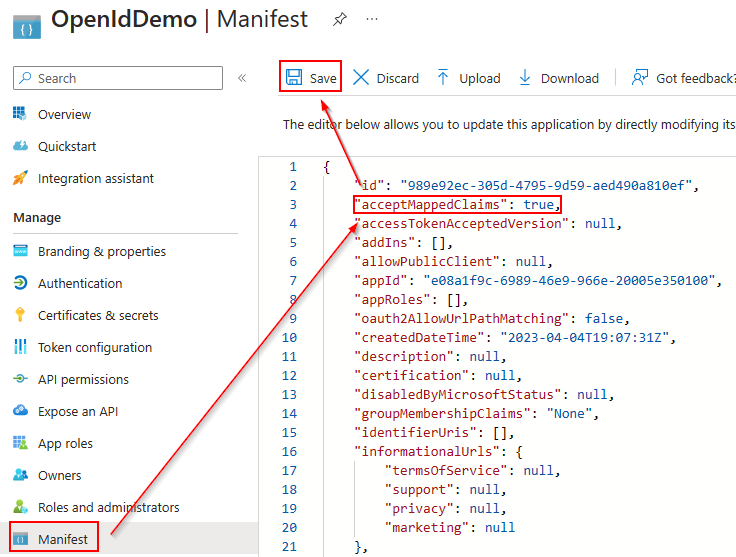
-
-
In the JSON editor that opens, use CNTRL+F to search the page for "redirectURIs".
-
Between the square brackets for "redirectUris", add the following object with your wild card modified redirect URI, making sure to replace <region> with your deployed region:
Copy{
"url": "https://*.auth.<region>.amazoncognito.com/oauth2/idpresponse",
} -
Between the square brackets for "redirectUriSettings", add the following object with your wild card modified redirect URI, making sure to replace <region> with your deployed region:
Copy{
"url": "https://*.auth.<region>.amazoncognito.com/oauth2/idpresponse",
"index": null
}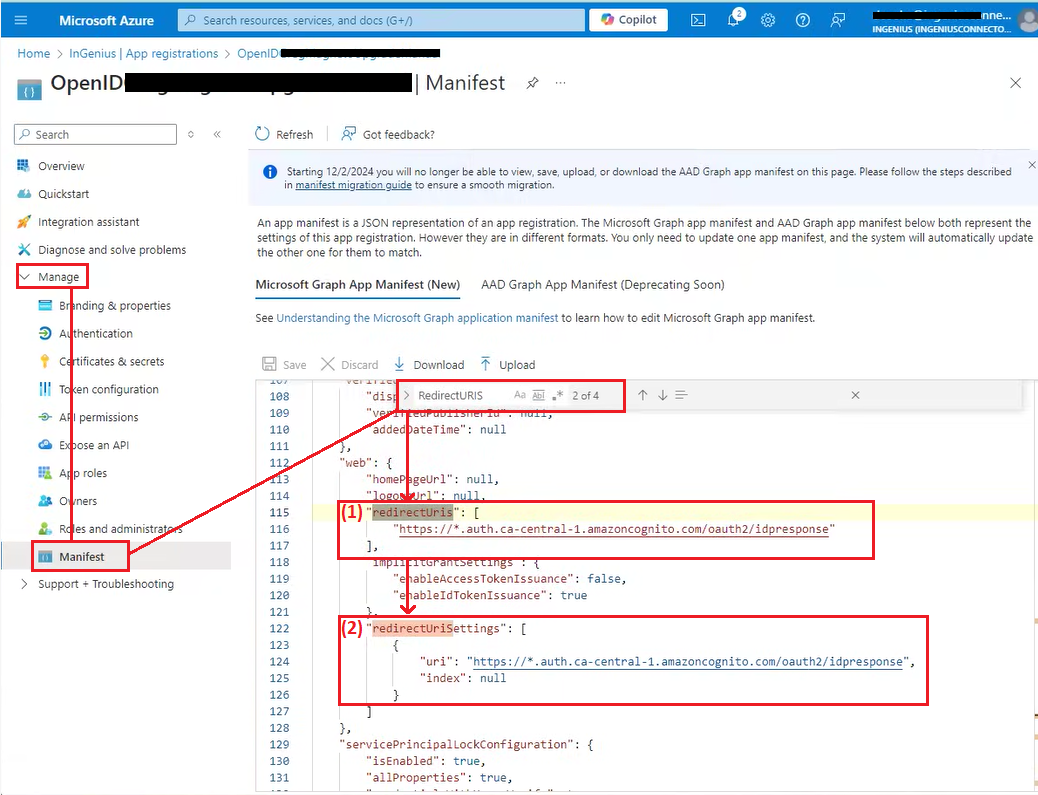
-
Ensure your resulting manifest matches the image above, then click Save.
Add Open ID App to Users of D365 Instance
-
Login to your D365 environment and select the App Launcher (9 dots in the top-right corner) and select the Admin app.
-
In the left-hand panel of the Admin app, click Show All, and then under the 'Admin Centers' section select All admin centers.
-
From the 'All admin centers' page, select Dynamics 365 Apps, then from the 'Power Platform admin center' page select Environments and select the specific environment for your D365 instance.
-
In the configuration page for your environment, click the Settings button in the top menu.
-
From the Settings page, click the 'Users + permissions' drop down and then select Application Users.
-
Click the '+ New app user' button in the top menu bar and fill in the information as follows:

-
In the App section, select the app you registered in the previous steps.
-
In the Security Roles section, select Basic User.
-
-
Click the Create button to complete.
Salesforce Pre-Deployment
Before InGenius can be integrated into your system, Salesforce must be pre-configured to meet the following requirements - click on each requirement listed below for details on its configuration:
Note: The configuration steps below should be performed by a Salesforce Admin.
-
Access to the InGenius Admin App can now be determined through user assignment to the "InGenius_Administrator" permission set. This permission set is automatically created during the installation of the InGenius apex packages. Salesforce System Administrators will still have access to the Admin App by default.
Update Salesforce Trusted URLs
In order to help protect your org from cross-site scripting and code injection attacks, Salesforce has updated their delivered CSP directions for Lightning pages. This change can prevent externally hosted content from loading. For InGenius to properly function, its URLs must be added to the trusted URL list in Salesforce.
You may either add a single generic URL covering all InGenius domains, or add two specific InGenius URLs. Choose the method that best fits your preferences.
Follow the instructions of either method 1 or method 2 below:
Method 1: Add Generic InGenius URL
-
Login to your Salesforce org and navigate to Setup.
-
Enter "trusted urls" into the Quick Find box and select Trusted URLs.
-
Click on the New Trusted URL button and add a new entry with the following fields:
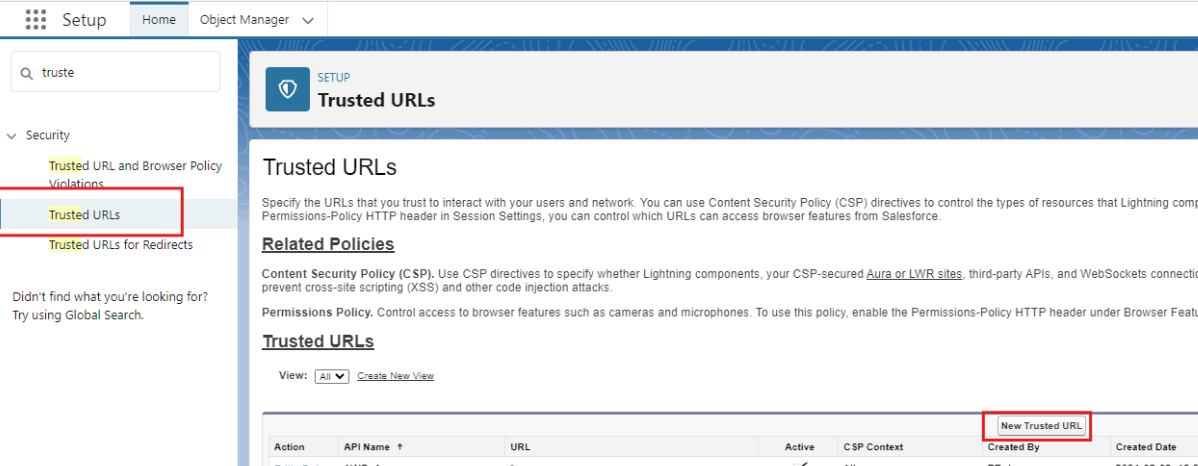
-
API Name: InGeniusAppUrl
-
URL: *.ingenius.com
-
Description: May be left blank
-
Ensure the 'Active' check box is checked.
-
Under 'Content Security Policy (CSP) Settings', select All from the CSP Context dropdown.
-
Under 'CSP Directives', ensure the 'frame-src (iframe content)' and the 'img-src (images)' boxes are checked
-
-
Click Save.
Note: The changes may take a few seconds to take effect before the app can be launched.
Method 2: Add Specific InGenius URLs
-
Login to your Salesforce org and navigate to Setup.
-
Enter "trusted urls" into the Quick Find box and select Trusted URLs.
-
Click on the New Trusted URL button and add a new entry with the following fields:
-
API Name: InGeniusAppUrl1
-
URL: https://app.<Region>.ingenius.com
Note: <Region> corresponds to your deployed InGenius region. (i.e ca-central-1, us-west-2, eu-west-1, or ap-southeast-2. Refer to Network Requirements for more information.)
-
Description: May be left blank
-
Ensure the 'Active' check box is checked.
-
Under 'Content Security Policy (CSP) Settings', select All from the CSP Context dropdown.
-
Under 'CSP Directives', ensure the 'frame-src (iframe content)' box is checked.
-
-
Click Save.
-
Click on Trusted URLs again and add another trusted URL with the following values:
-
API Name: InGeniusAppUrl2
-
URL: https://app.ingenius.com
-
Description: May be left blank
-
Ensure the 'Active' check box is checked.
-
Under 'Content Security Policy (CSP) Settings', select All from the CSP Context dropdown.
-
Under 'CSP Directives', ensure the 'frame-src (iframe content)' and the 'img-src (images)' boxes are checked
-
-
Click Save.
Note: The changes may take a few seconds to take effect before the app can be launched.
Configure Personal Voicemail
In order for agents to view and receive personal voicemail, a couple of settings must be configured under your Contact Center settings. Follow the instructions below:
-
Log into your Salesforce Org
-
Navigate to Feature Settings | Voice | Partner Telephony Contact Centers
-
Under the 'Voice Extension' dropdown, select InGenius Voicemail.
-
Check the 'Always Show Voice Extension' box.
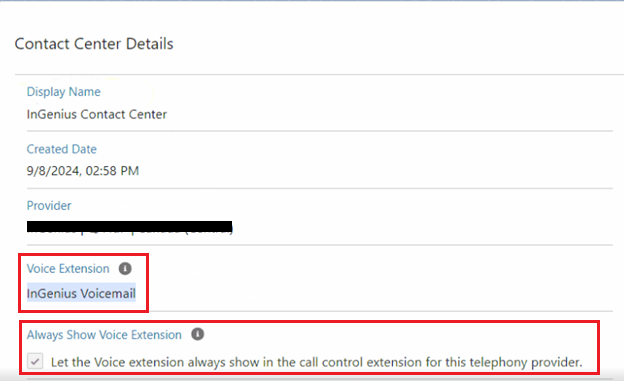
-
Click Save.
Virtual Desktop Requirements
Before using Salesforce with a virtual desktop, you must enable the "Remote Media for Virtual Desktop" permission for your virtual desktop users:
-
Log into your Salesforce Org.
-
From Setup, navigate to Users | Permission Sets
-
Find the Contact Center Agent (Partner Telephony) permission set and click Clone.
-
Enter a name for the cloned permission set and click Save.
-
Select the newly created permission set and click App Permissions.
-
Click Edit and enable 'Remote Media for Virtual Desktop', then Save.
-
Click Manage Assignments, and then Add Assignments.
-
Assign the users you wish to add virtual desktop permissions for.
For more information on enabling the 'Remote Media for Virtual Desktop' permission, refer to the Salesforce documentation.
Note: With Genesys Cloud, it is best to use the WebRTC Media Helper. Log into the media helper on your local machine, and then into Genesys in your virtual environment. For more information on running Genesys in a virtual environment, refer to the official documentation.
Set Referrer-Policy HTTP Header
In order to allow InGenius to correctly authenticate with the connector app, you must configure your Salesforce Session settings as follows:
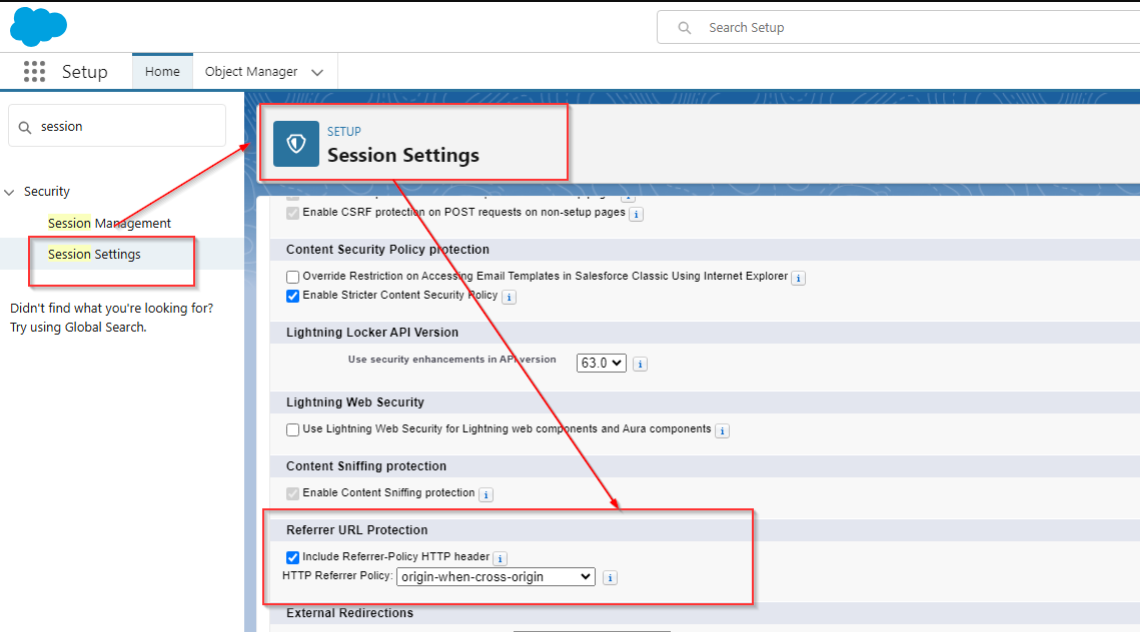
-
Login to your Salesforce Org.
-
In the search bar, search for 'Session' and select the 'Session Settings' option under Security.
-
Under the 'Referrer URL Protection' section, ensure that the 'Include Referrer-Policy HTTP header' box is checked.
-
Set the HTTP Referrer Policy to 'origin-when-cross-origin'.
-
Save your settings.
Caution: If either the checkbox is not checked, or no referrer policy has been selected, the InGenius app will fail to authenticate.
Enable Browser Audio Permissions
To ensure InGenius notifications and ringtones are uninterrupted, it is recommended that you add the Salesforce site to your browser's audio allowlist. Follow the instructions below:
For Chrome browsers:
-
Login to your Salesforce Org.
-
Click the 'View site information' button to the left of the URL on the address bar, and then click 'Site settings'.
-
Ensure the Microphone and Sound settings are changed to Allow.


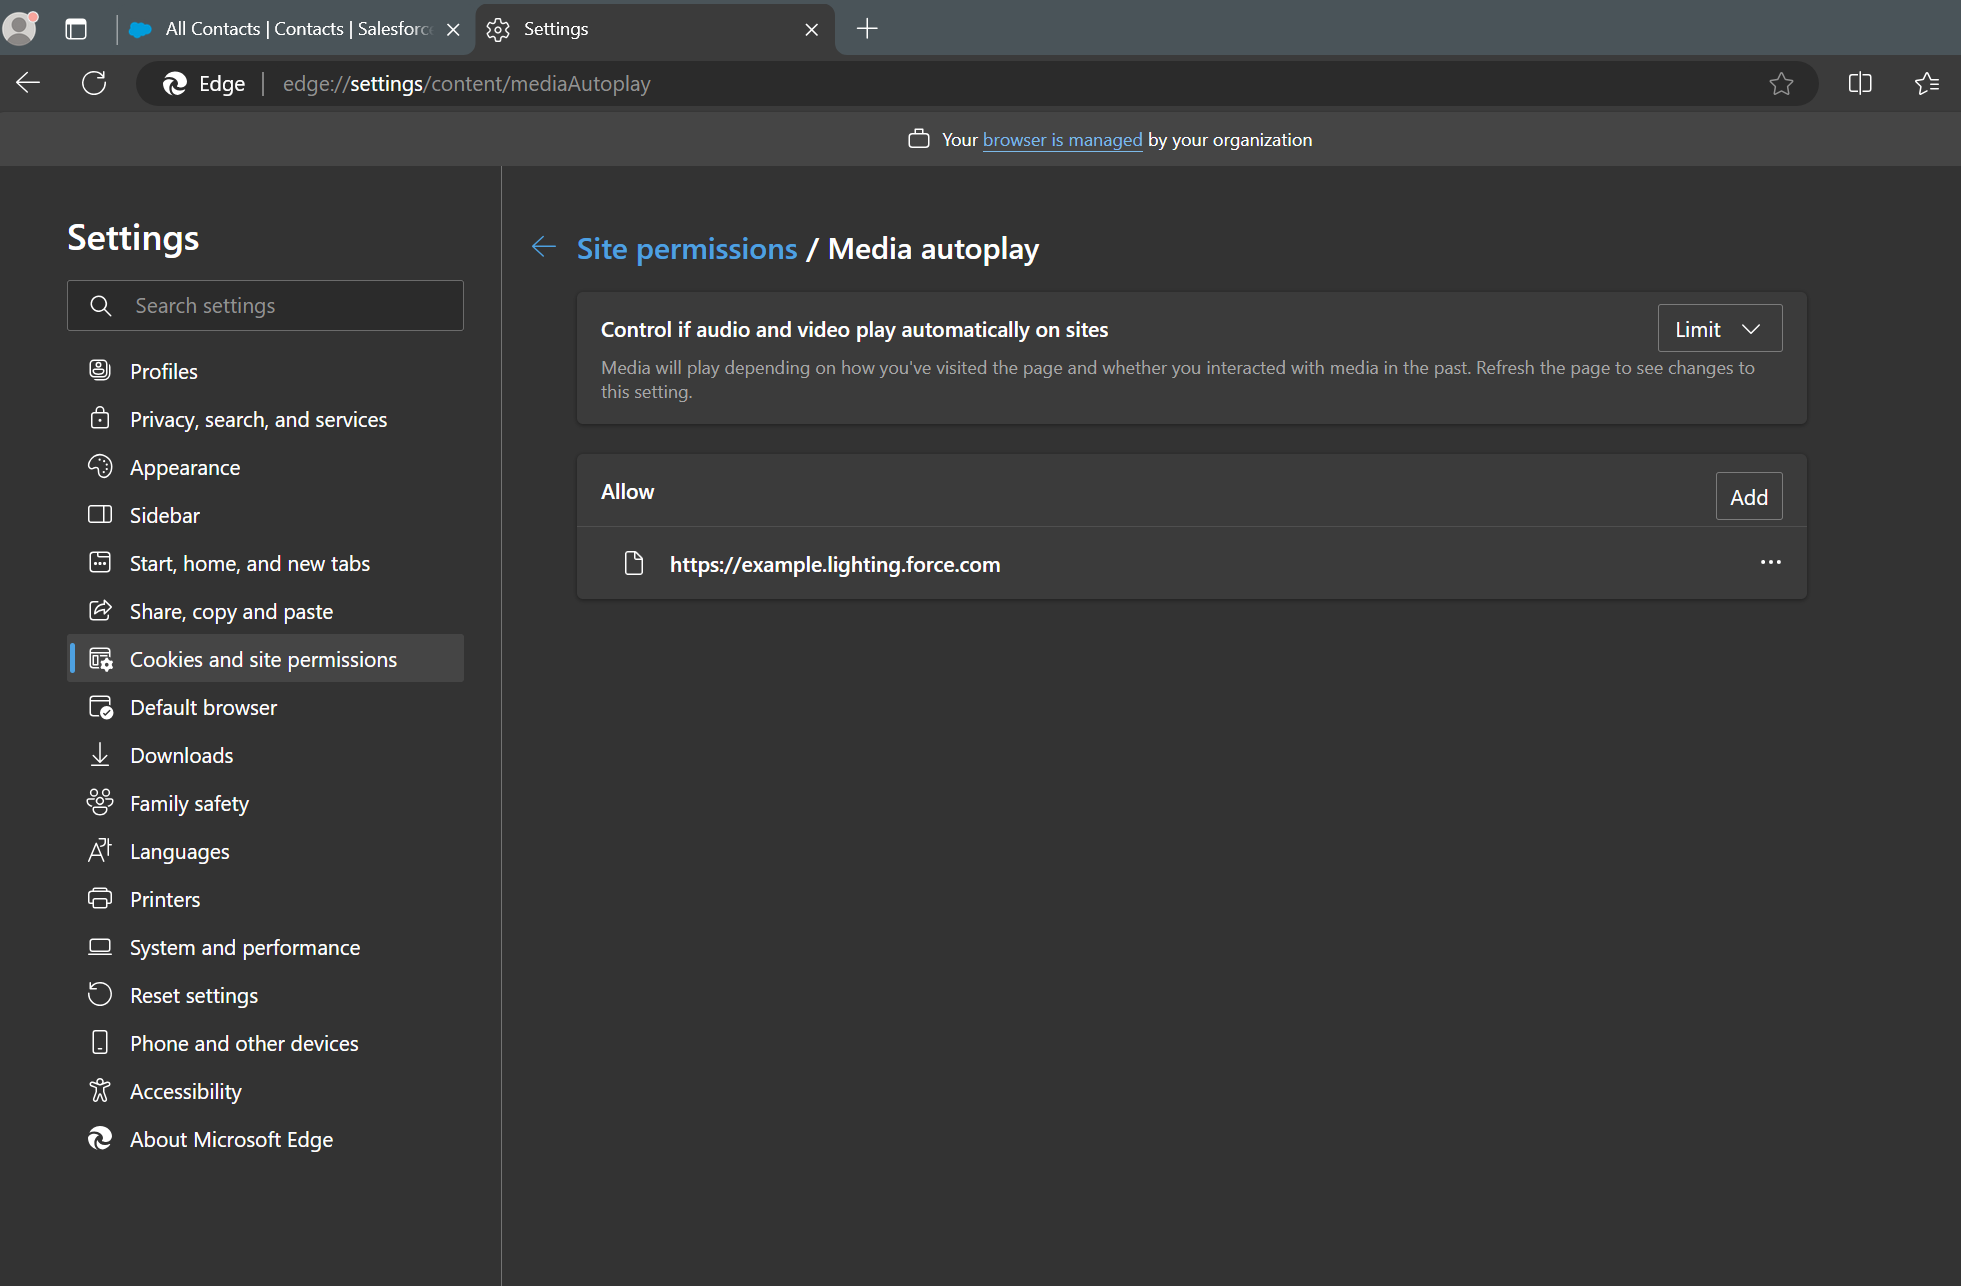
For Edge browsers:
-
Navigate to edge://settings/content/mediaAutoplay in the browser.
-
Add your Salesforce org URL to the Allow list.

ServiceNow Pre-Deployment
Before InGenius can be integrated into your environment, your ServiceNow instance must be pre-configured with the following:
-
Create Restricted Caller Access Privileges for Table HR Case
-
Modify Restricted Caller Access Privileges for Table HR Case
Add System Definition Plugins
To enable all features of the InGenius integration, you will require the following System Definition plugins installed in your ServiceNow instance:
| Plugin | Plugin ID | Details |
| OpenFrame | com.sn_openframe | Required as an interface to integrate external communication with ServiceNow. |
| Customer Service | com.sn_customerservice | Required for Create New/Prefill functionality. |
| Human Resources Scoped App | com.sn_hr_core | Required for prefill for HR Case, HR Agent Workspace app. |
| Agent Workspace for HR Case Management | sn_hr_agent_ws
Note: This plugin was marked for deprecation with ServiceNow Washington. If you cannot find it, skip it. |
Required for prefill for HR Case. |
| Human Resources Scoped App Workspace |
com.sn_hr_agent_workspace Note: This plugin was marked for deprecation with ServiceNow Washington and Xanadu. If you cannot find it, skip it. |
Required for visibility of HR Agent Workspace View and Agent Workspace View |
| Advanced Work Assignment - Agent Affinity | com.glide.awa.agent_affinity | Required as an interface to integrate external communication with ServiceNow |
| Advanced Work Assignment for Incidents | com.snc.incident.awa | Required as an interface to integrate external communication with ServiceNow |
Import InGenius Update Set
After your ServiceNow instance has been registered by the InGenius support team, you will be provided with an update set to import into your instance. Once receiving the update set XML, follow the instructions below:
Note: If you have not been provided with an update set, contact InGenius Support.
-
Login to your ServiceNow Instance.
-
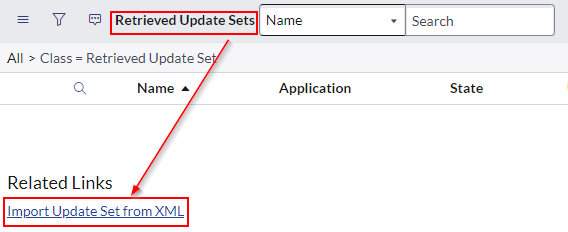
Click the All tab in the navigation menu, and search for 'Retrieved Update Sets'
-
Click the Import Update Set from XML button in the bottom-left corner of the window.
-
Click the Choose File button and select the InGenius XML update set you have been provided, then click Upload.
-
Find the newly uploaded update set in the Retrieved Update Set screen and select it.
-
Click on the Preview Update Set button to confirm the file has been uploaded successfully, then click Close.
-
Click on the Commit Update Set button and then click Close.

Update UI Action Table
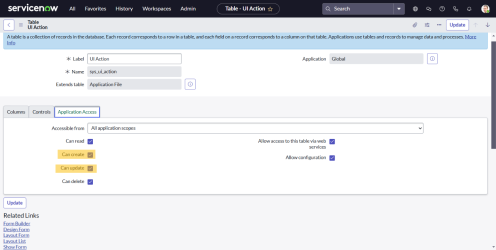
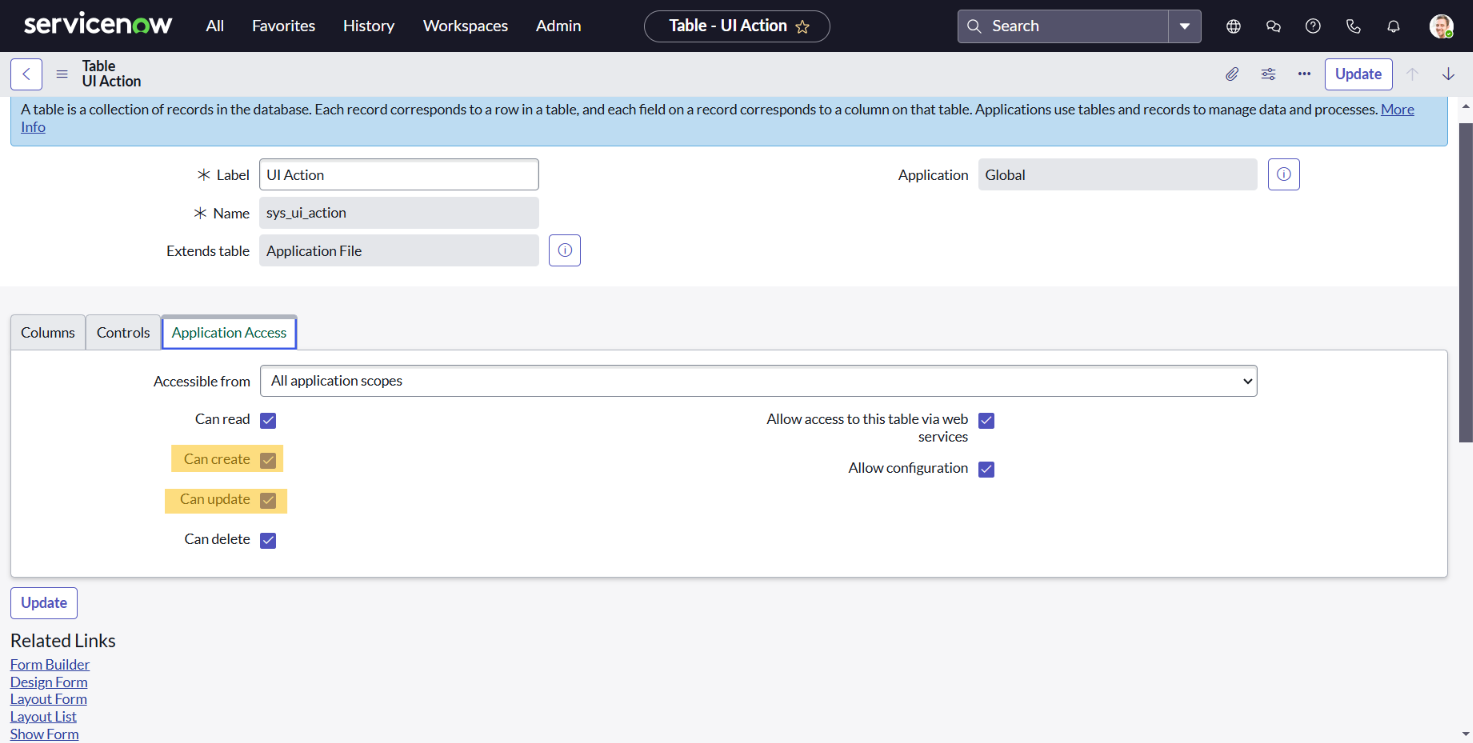
In order to allow UI elements in ServiceNow to be modified by InGenius, you must grant application access through the following:
-
Login to your ServiceNow instance.
-
Navigate to All | Tables | sys_ui_action | Application Access
-
Under the Application Access tab, ensure that the 'Can create' and 'Can update' boxes are checked.
-
Select Update.
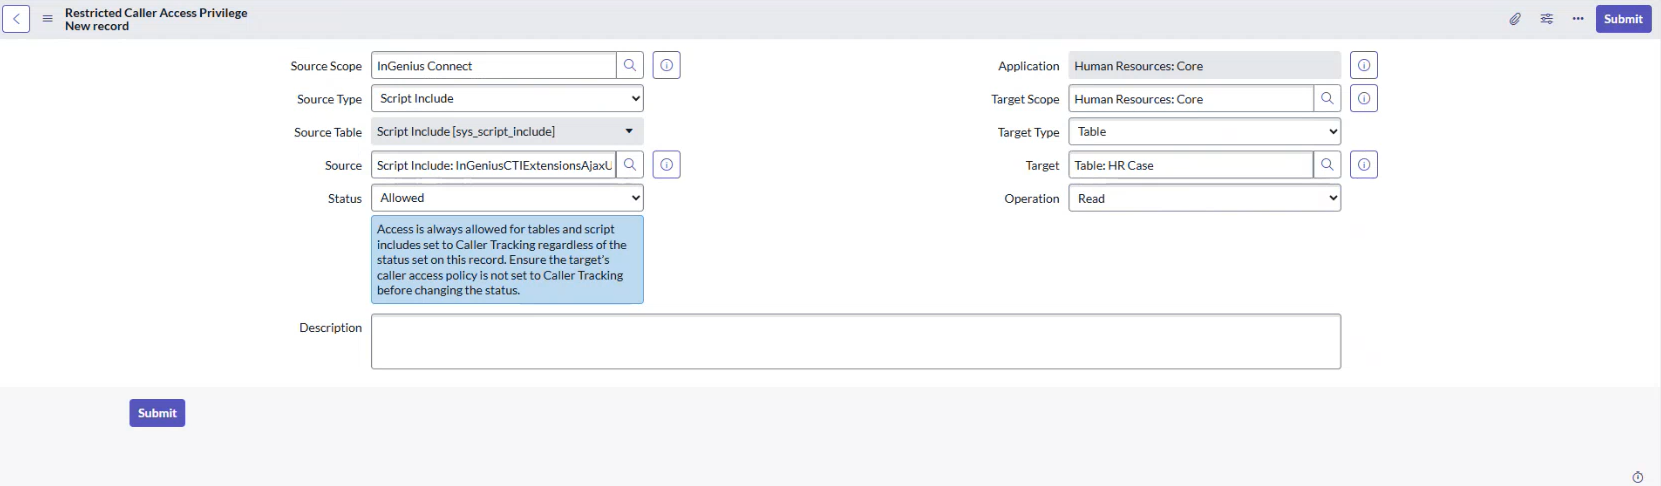
Create Restricted Caller Access Privilege for Table HR Case
Before saving a call log for a Human Resource (HR) Case entity as the related record, restricted caller access privileges must be created and pre-configured to avoid an error in reading that request. Follow the instructions below:
-
Login to your ServiceNow instance.
-
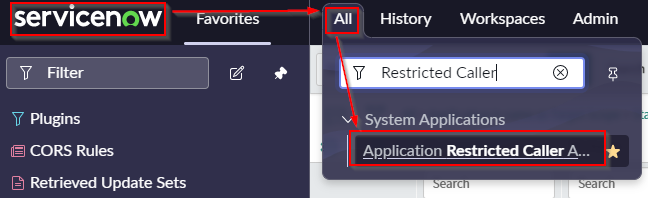
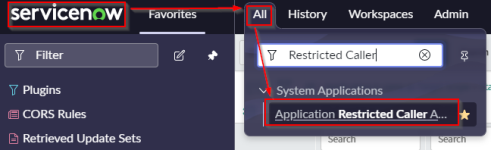
Navigate to All | System Applications | search for 'Application Restricted Caller Access'
-
From the menu, in the top right corner of the page, click the 'New' button.
Note: Ensure to set your application scope from the top right menu to 'Human Resources: Core', or you will not be able to configure the new record properly.
-
Create the new record as follows:

-
Source Scope: InGenius Connect
-
Source Type: Script Include
-
Source: 'Script Include: InGeniusCTEExtensionsAjaxUtility'
-
Status: Allowed
-
Application: Human Resources: Core
-
Target Scope: Human Resources: Core
-
Target Type: Table
-
Target: Table: HR Case
-
Operation: Read
-
-
Click Submit.
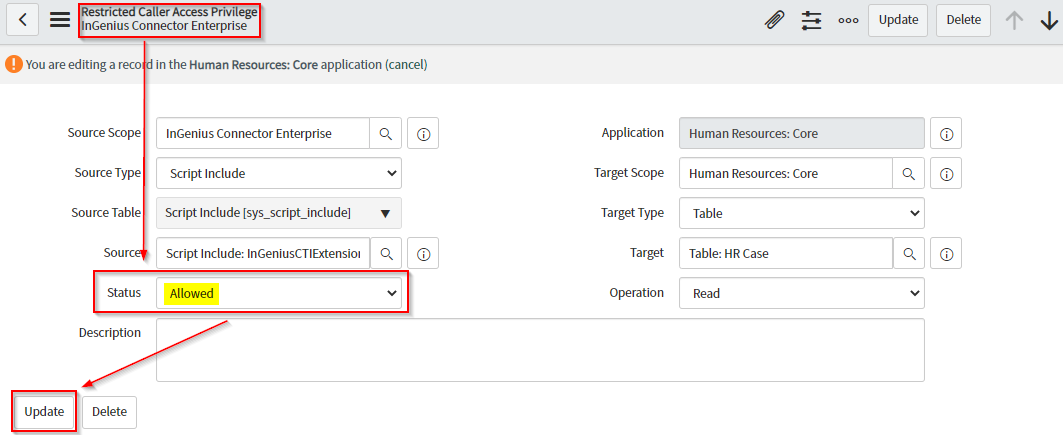
Modify Restricted Caller Access Privilege for Table HR Case
When saving a call log for a call which has a Human Resource (HR) Case entity selected as the related record, restricted caller access privileges must be configured correctly to avoid an error in reading that request. To ensure this operation is allowed, follow the instructions below:
Note: This step is only required if you have not already created the caller access privilege for Table HR Case.
-
Login to your ServiceNow instance.
-
Navigate to All | System Applications | search for 'Application Restricted Caller Access'
-
In the Restricted Caller Access Privileges entity table, search for 'Requested' under the Status column and find the entity defined as follows:
-
Operation: Read
-
Status: Requested
-
Application: Human Resources: Core
-
Target Scope: Human Resources: Core
-
Target: Table: HR Case
-
Source: Script Include: InGeniusCTIExtensionAjaxUtility
-
Source Scope: InGenius Connector Enterprise

-
-
Click the Here link located in the top ribbon to edit this entity.

-
Modify the Status from Requested to Allowed, and then click the Update button to save your changes.